Dragonsong's Reprise

Summary
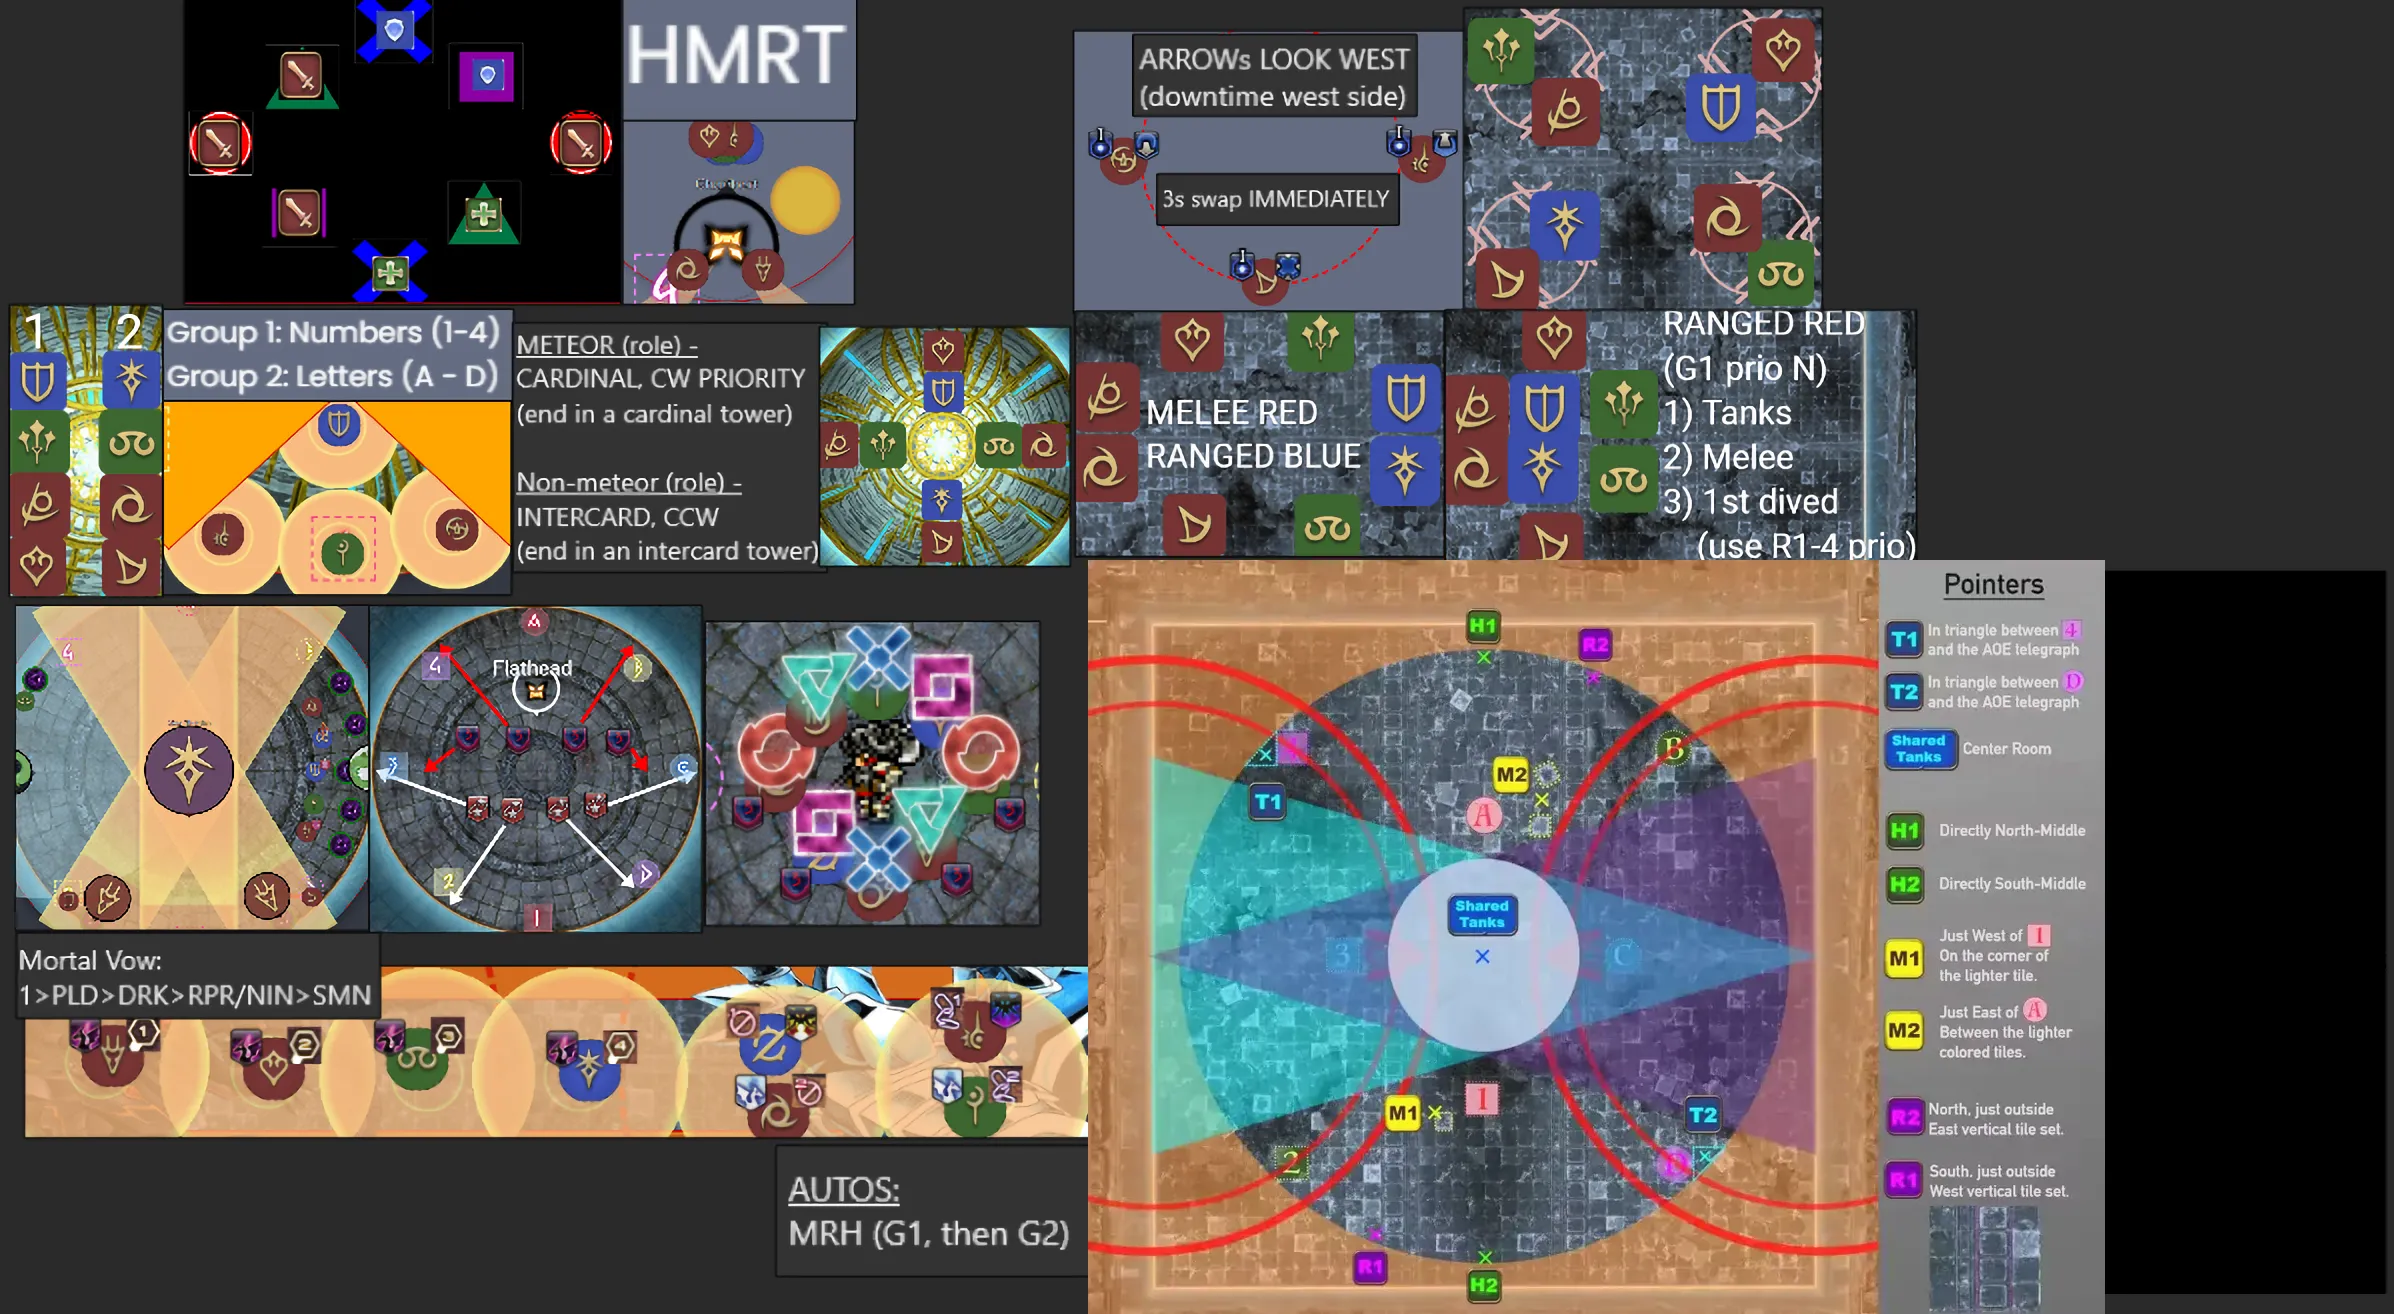
- Vault Knights: HMRT
- Thordan: DRK Rel, Role adjust
- Nidhogg: Westhogg
- Eyes: Melee Red, Ranged Blue
- Dark Thordan: Party Right Wrath, Dooms North & Anchor
- Double Dragons: Triangle WB1, DTTMC Vow, Static WB2
- Dragonking Thordan: First Akh 3-3-2, Second and Third 6-1-1 (Party NW Tower)
BiS Notes
- Gear from the first Dawntrail tier (M1-M4S) caps stats for this ultimate, this is technically BiS aside from more niche cases like healer (no DH synched gear).
- Mix of i600 (Asphodelos) gear, and i605 gear from Lapis Manalis.
- Endwalker Relic Weapons are BiS and have their substats capped at 269.
- DSR BIS
Cheatsheet
(Click for Full-size)
General Resources
Tessan
This guide is not based NA strats but it is a very good visual guide for the mechanics so if you use it make sure you only use it as a base for learning and not for the actual strats! For example: Healer/Tank spreads during Strength lightning spreads are swapped in the Tessan Video Guide!!!.
Vault Knights (Door Boss)
- Toolbox
- Playstation Macro
1D △ T X T □2D O D O3D □ H X H △Thordan
- Start + Strength of the Ward
- Sanctity of the Ward - Drk Relative Dodges
- Sanctity of the Ward pt. 2 - Meteors
Nidhogg
- Toolbox
- Westhogg
Eyes
Intermission
Tank LB
Make sure you talk to the other tank about whos LB’ing, usually the prio for who does the LB is WAR > DRK > PLD > GNB
Thordan II
- Party Right Wrath
- Wrath Toolbox
- Dooms North and Anchor DOTH
- Doth Toolbox
DOTH Recovery
-
If you die before the knockback you can accept raise a little before it goes off (When the shapes show up on other players) so that you invuln the fire spreads. This is better than raising and not making it to your knockback spot and risking overlapping someone.
-
If a non doom player dies before the Playstation shapes appear the shape that is gonna be missing is always X (Relative North/South Knockbacks). Knowing this can help save a pull!
- Basically, if you are non doom and dont have a shape get knocked North or South to not clip anyone!
- Doth Quake Dodges
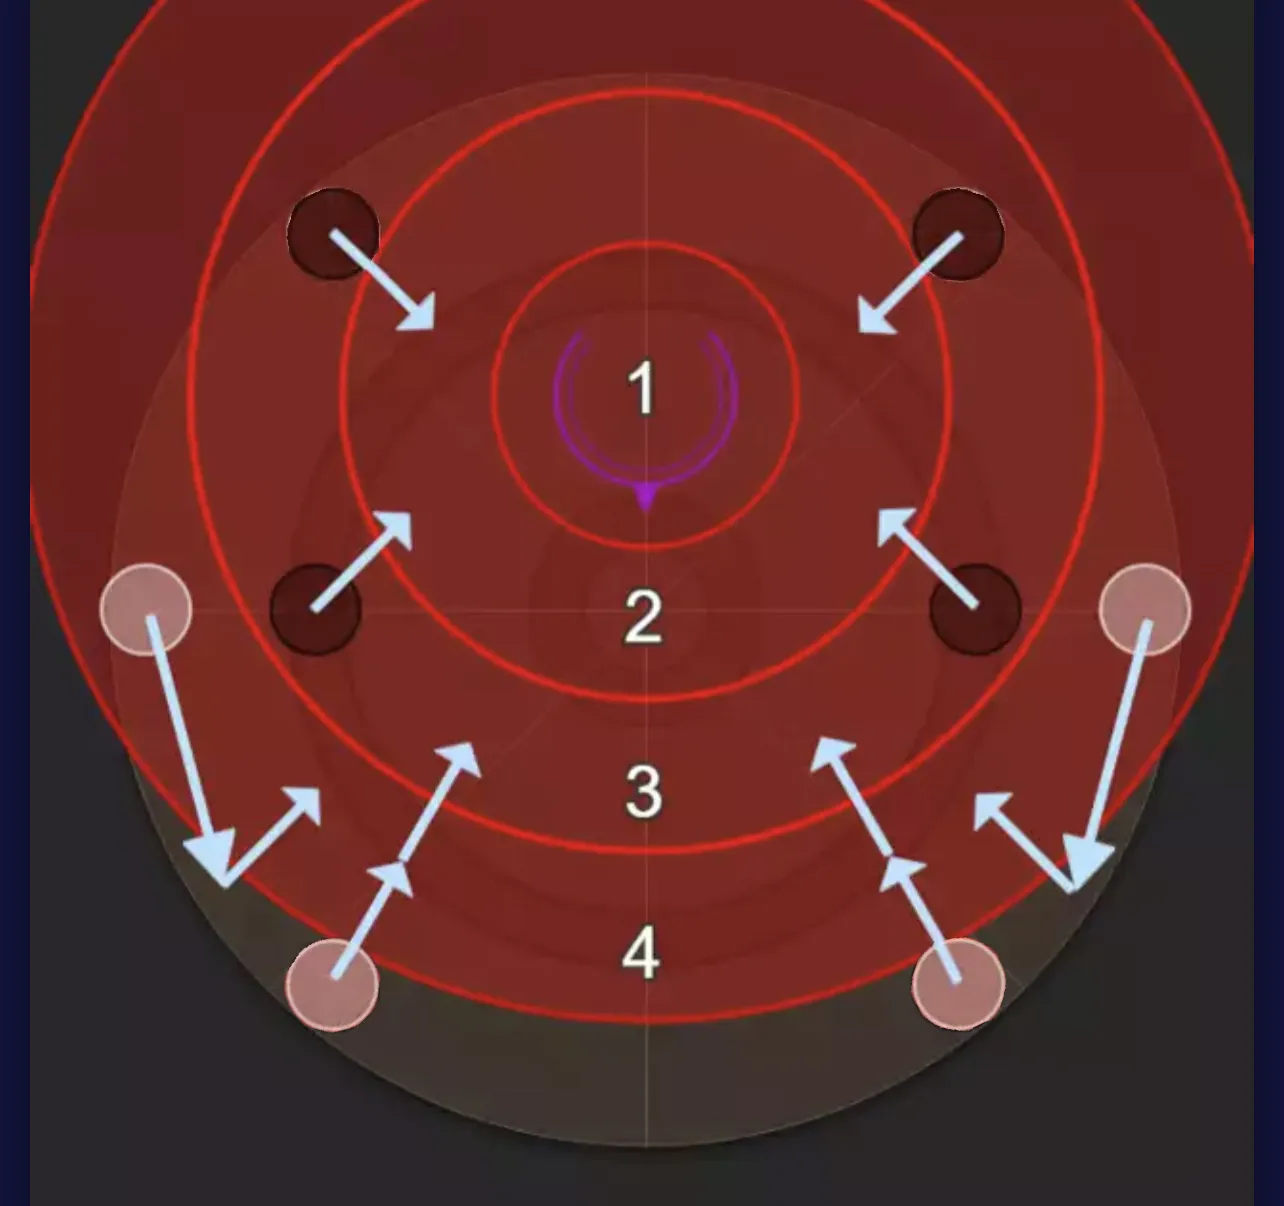
Double Dragons
- Toolbox
- Triangle WB1
- Static WB2
- Wyrmsbreath 2 Positions
Post DOTH without invuln
- You can use your 30% Mit+Short+Rep for the Buster after DOTH and then just live WB1 with both short mits.
- This makes it so you dont have to rely on needing extra mit to survive the Heel/Cleaves (otherwise you need Reprisal + Feint and one extra mit aside from your normal CDs).
- If you dont trust your co-tank to mit you in Wyrmsbreath 1 you can use your third CD (the one you use in Hallowed 2) on the Wyrmsbreath Buster and you’ll live and have it back for Hallowed 2.
Niddhog's Vow
- Melees with defensives should prio vow, just because you are flexing doesnt mean you also cant take the vow, this makes healers life easier and makes it so you dont wipe 15m into the fight because of a DRG exploding!
- MNK/NIN > SAM/RPR > DRG prio is ideal
Cauterize
The pyretic in Cauterize snapshots VERY early, make sure you hit escape (circle on controller) TWICE. If you still have the boss targetted it can proc the pyretic even if you dont press an action. If you do get ticked by Cauterize just move again so that you die and dont make Hraes enrage
If Hrae enrages you can use Tank LB2 (You should have it assuming you used LB2 in DOTH) to live the enraged Touchdown with full health + shields.
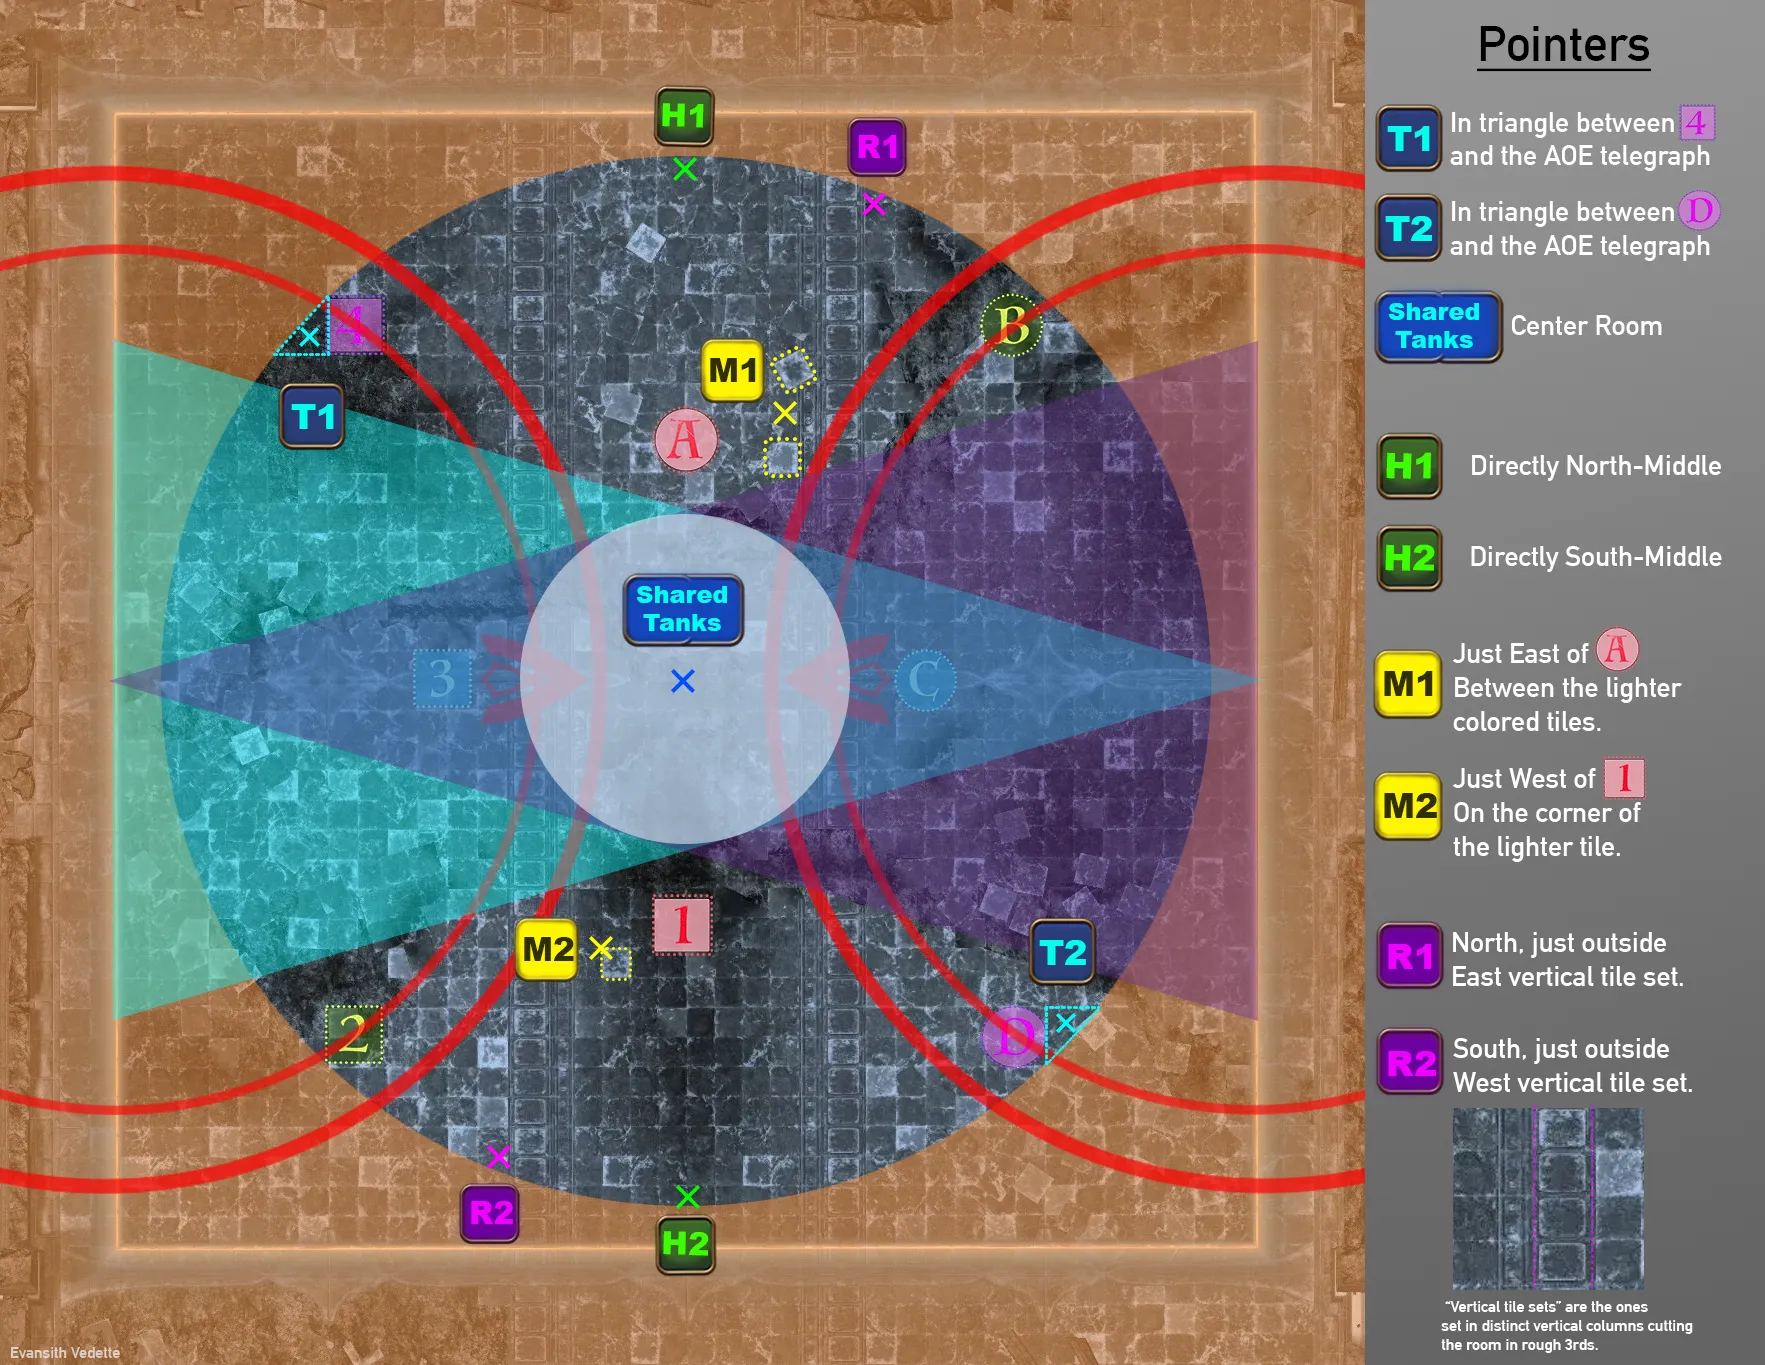
Dragon-king Thordan
DKT Mitigation
- Make sure to wait until the SECOND bleed falls off in Dragon-king transition before you use shields, this includes things like Veil/Shake. (Theres one from Estinien and one when Thordan drops down and does his roleplay)
- Mitigation for DKT doesnt snapshot on the cast for all the hits, if you can, make sure to use it around 70-80% of the castbar so it catches all the hits! This only applies to 10s cooldowns.
- Kerachole NEEDS to be used after second trinity to be up for Gigaflare!
- Soil NEEDS to be used after the first trinity to be up for Gigaflare (Soil lasts slightly longer than Kera due to lingering)
Videos
Tanks
Healers
DPS
Markers
Click to show marker presets
Fight Markers
1{"Name":"DSR","MapID":788,"A":{"X":99.855,"Y":0.0,"Z":90.945,"ID":0,"Active":true},"B":{"X":114.277,"Y":0.0,"Z":87.155,"ID":1,"Active":true},"C":{"X":109.996,"Y":0.0,"Z":99.53,"ID":2,"Active":true},"D":{"X":114.097,"Y":0.0,"Z":113.67,"ID":3,"Active":true},"One":{"X":99.736,"Y":0.0,"Z":109.786,"ID":4,"Active":true},"Two":{"X":86.199,"Y":0.0,"Z":113.988,"ID":5,"Active":true},"Three":{"X":90.829,"Y":0.0,"Z":99.399,"ID":6,"Active":true},"Four":{"X":85.728,"Y":0.0,"Z":86.084,"ID":7,"Active":true}}PF Setup Markers:
- P1 (Door Boss)
1{"Name":"Door Boss","MapID":788,"A":{"X":93.331,"Y":0.0,"Z":103.162,"ID":0,"Active":true},"B":{"X":96.814,"Y":0.0,"Z":106.709,"ID":1,"Active":true},"C":{"X":103.22,"Y":0.0,"Z":106.669,"ID":2,"Active":true},"D":{"X":106.601,"Y":0.0,"Z":103.18,"ID":3,"Active":true},"One":{"X":93.138,"Y":0.0,"Z":96.407,"ID":4,"Active":true},"Two":{"X":96.841,"Y":0.0,"Z":93.281,"ID":5,"Active":true},"Three":{"X":103.441,"Y":0.0,"Z":93.119,"ID":6,"Active":true},"Four":{"X":106.664,"Y":0.0,"Z":96.403,"ID":7,"Active":true}}- Strength Spots
1{"Name":"Strength","MapID":788,"A":{"X":106.846,"Y":0.0,"Z":116.184,"ID":0,"Active":true},"B":{"X":107.397,"Y":0.0,"Z":118.676,"ID":1,"Active":true},"C":{"X":104.447,"Y":0.0,"Z":119.195,"ID":2,"Active":true},"D":{"X":109.116,"Y":0.0,"Z":117.392,"ID":3,"Active":true},"One":{"X":94.47,"Y":0.0,"Z":115.901,"ID":4,"Active":true},"Two":{"X":92.074,"Y":0.0,"Z":117.757,"ID":5,"Active":true},"Three":{"X":94.763,"Y":0.0,"Z":118.15,"ID":6,"Active":true},"Four":{"X":97.031,"Y":0.0,"Z":118.161,"ID":7,"Active":true}}- Sanctity Spots
1{"Name":"Sanctity","MapID":788,"A":{"X":0.0,"Y":0.0,"Z":0.0,"ID":0,"Active":false},"B":{"X":0.0,"Y":0.0,"Z":0.0,"ID":1,"Active":false},"C":{"X":0.0,"Y":0.0,"Z":0.0,"ID":2,"Active":false},"D":{"X":0.0,"Y":0.0,"Z":0.0,"ID":3,"Active":false},"One":{"X":99.362,"Y":0.0,"Z":114.586,"ID":4,"Active":true},"Two":{"X":101.827,"Y":0.0,"Z":117.677,"ID":5,"Active":true},"Three":{"X":97.304,"Y":0.0,"Z":117.619,"ID":6,"Active":true},"Four":{"X":98.707,"Y":0.0,"Z":119.762,"ID":7,"Active":true}}- Death of the Heavens Conga
1{"Name":"DOTH","MapID":788,"A":{"X":93.526,"Y":0.0,"Z":115.076,"ID":0,"Active":true},"B":{"X":96.365,"Y":0.0,"Z":114.982,"ID":1,"Active":true},"C":{"X":99.539,"Y":0.0,"Z":115.437,"ID":2,"Active":true},"D":{"X":102.014,"Y":0.0,"Z":115.455,"ID":3,"Active":true},"One":{"X":104.624,"Y":0.0,"Z":115.241,"ID":4,"Active":true},"Two":{"X":107.104,"Y":0.0,"Z":115.136,"ID":5,"Active":true},"Three":{"X":109.267,"Y":0.0,"Z":114.065,"ID":6,"Active":true},"Four":{"X":111.342,"Y":0.0,"Z":113.233,"ID":7,"Active":true}}- Wyrmsbreath 1
1{"Name":"WB1","MapID":788,"A":{"X":0.0,"Y":0.0,"Z":0.0,"ID":0,"Active":false},"B":{"X":0.0,"Y":0.0,"Z":0.0,"ID":1,"Active":false},"C":{"X":0.0,"Y":0.0,"Z":0.0,"ID":2,"Active":false},"D":{"X":0.0,"Y":0.0,"Z":0.0,"ID":3,"Active":false},"One":{"X":101.281,"Y":0.0,"Z":114.619,"ID":4,"Active":true},"Two":{"X":97.562,"Y":0.0,"Z":118.983,"ID":5,"Active":true},"Three":{"X":105.705,"Y":0.0,"Z":118.434,"ID":6,"Active":true},"Four":{"X":0.0,"Y":0.0,"Z":0.0,"ID":7,"Active":false}}- Static Wyrmsbreath
1{"Name":"Static WB2","MapID":788,"A":{"X":98.528,"Y":0.0,"Z":111.513,"ID":0,"Active":true},"B":{"X":99.416,"Y":0.0,"Z":119.375,"ID":1,"Active":true},"C":{"X":0.0,"Y":0.0,"Z":0.0,"ID":2,"Active":false},"D":{"X":0.0,"Y":0.0,"Z":0.0,"ID":3,"Active":false},"One":{"X":95.583,"Y":0.0,"Z":119.301,"ID":4,"Active":true},"Two":{"X":98.077,"Y":0.0,"Z":116.847,"ID":5,"Active":true},"Three":{"X":100.039,"Y":0.0,"Z":114.569,"ID":6,"Active":true},"Four":{"X":102.236,"Y":0.0,"Z":112.416,"ID":7,"Active":true}}