Dancing Mad
BiS Notes
- Gear from the final Dawntrail tier (M9-M12S) is BiS for this ultimate, please do not go into PF if you don’t have BiS as current ultimates are much tighter than older ones on execution and DPS checks.
- Dawntrail Relic Weapons will be BiS once at their FINAL form.
General Resources
P1: Kefka
Arrows Cheatsheet (In-Game)
[stgy:a4VbkvnqedaYql1cKgYD-v1TGR8hYES6gNvOqPYBgBS4rzWTDCbQq0Fkgp+QrWZmNIWoXepYorhK7rKChN-6pvrE2DaytcrTEN41bceJvArBk8N3uqtP4vu620iBV9xjVTPOUrEZvk4MJx3JGVXxpKANohPTVA6DJNOJl3zrHpP0kGLHvxortEtsgi0G3y5ljsSRUvw1TW6Q0iEGrQFOs1pWCu+Gw4nqjsH3JFHrET4hg6V-lIFqOz+q2+MnkSzKRbLwh+Bpb9j9bUm8ARogXrZqm0aidRdmmQsKYfrcr4n3uZhJDA0UqxiMo7VRzx9xvWuwdMBQxGeq4oTxa0AC7PhilxWwyAXy+SXaEQ9v6xGgz1TiCOkGY1IJt7+wOEP4EtF-Yev4+ekB7JwBKnxYfZyTIj2RiYpXGNQm1KzGOopDMX95EtI8Cxcp7OFoFjb4TfY9uLAApZu7ST3hLY8KFHR1CHGLNXjC5Xs0mXAq4jJwrjw6am6G0cnPrD2+uy5ADYRvfe40GNFwuq9Mel]Arrows Cheatsheet
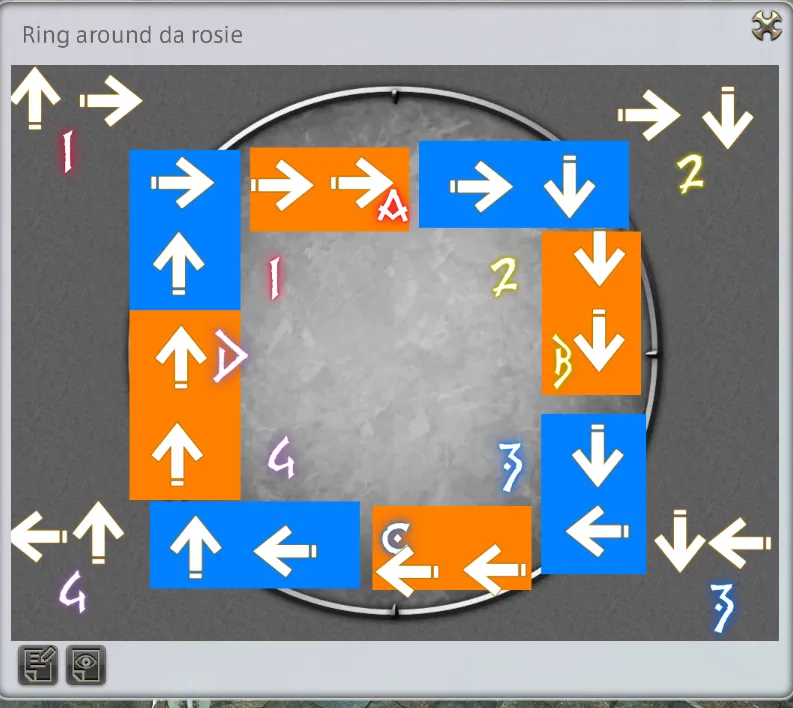
(Click for Full-size)
DPS Check
- DPS check for this phase is having Kefka under 15%, if you fail the puzzle you can still prog up to end of P2!
Click for Clips
- Graven Image 1
- Graven Image 2
- Tele-trouncing + Graven Image 3
P2: God Kefka
- Fae P2 Doc
- Forsaken Video Guide
- Kroxy Rinon Forsaken
- Kroxy Rinon Forsaken Explanation
- Trines
- Forsaken WTFDIG Analyzer
Pot Usage
- Potting at the very start of this phase will still let you get a pot at the first 2m in P3. Yes, this is a raw pot, but +1 pot is better than no pot at all. If you are still progging, pot where you will get the most damage then adjust once comfier.
Click for Clips
- Forsaken (VOD link as the mech is longer than 1m)
- Trines (Tank PoV)
- Trines (Party PoV)
P3: Exdeath & Chaos & Kefka
- Full Phase Doc
- Black Holes Shortcut
- Alternative Black Holes (Double Tether DSA)
- Non LB3 Strat
- Limit Cut Macro Sheet (For posting what marker to go on party chat)
Black Holes Cheatsheet (In-Game)
[stgy:aZTH45t2tXRCh6WYl3qsEDWvELKwC9qiqP-v71ZXGkaibvDUH+-49CD9PnWo9MTkoK1+1trXo8OQs754ui+f77dh6fB7sE3f4V6Y6cxwmODi3mqGHVh4m2EvTXvzYrll3oIve1LvgVgSjxMV07yfMxqdFqKPe7TpAE04Jdjs3Ou7UslvIXyHCH09dOCHhLXFmEi7axj7teMk8U2G67sw0NsmRtAvREQjrEA5jevRF3BGaQKWDLDNtbEURlL2V2-KpRGUmZBbjZUHgphRI080AMSfeNRFsJUdtS2DvRMISWijV-CficT19PeuVke6B0+s5L7e1t5yXtNwnRSyFrhw4u2ZwYKj4Io2t8IE970qWvD7q+H-XPMGnMf-Z8YMSmcw2PMl37omAfWORUEuWVF2z5uL2MDlmFg81kIzvJ+B9yrrYw1-2UJ2hD7cwOAuJpUf0thJ87tRkzcahKKbeQA8YH9uVlpmk7DRlObSlOkMSi0SSt+Nja0TxEHjVl7qpacr845U6d5ArqRnIB2lm1dqzc-vowL5SwhxgI6VSBbYff72bl+Z+a0oEJ0GvsnTCNfeV3XIthlWTJJd9eyJu26q9W7KtgOe7R-IH-QseBn7UeNpBGgbhGLvh4n9WGnYDYjJVItmpOuupE18KrdSzvpY2RSD6GFH5t48Wedz30d1FrLoqt]Black Holes Cheatsheet
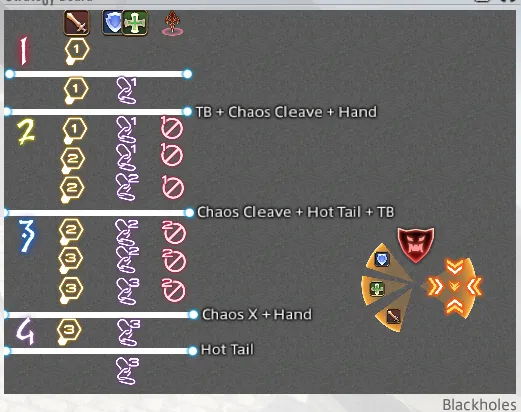
(Click for Full-size)
2m Usage
- You want to kill one of the bosses (normally Chaos), then hold as much as possible (until the M in the Meteor cast) while still sending your 2ms so that you can have two 2m usages in P4. Once you are comfy you can send the 2ms but hold the 30s buttons so that you can have an easier time with the P4 DPS check.
P4: Kefka Says
P5: Ultima Kefka
Markers
Click to show marker presets
- Square Waymarks
{"Name":"Square (24x24) (CW Pairs)","MapID":1094,"A":{"X":100,"Y":0.0,"Z":88,"ID":0,"Active":true},"B":{"X":112,"Y":0.0,"Z":100,"ID":0,"Active":true},"C":{"X":100,"Y":0.0,"Z":112,"ID":0,"Active":true},"D":{"X":88,"Y":0.0,"Z":100,"ID":0,"Active":true},"One":{"X":88,"Y":0.0,"Z":88,"ID":0,"Active":true},"Two":{"X":112,"Y":0.0,"Z":88,"ID":0,"Active":true},"Three":{"X":112,"Y":0.0,"Z":112,"ID":0,"Active":true},"Four":{"X":88,"Y":0.0,"Z":112,"ID":0,"Active":true}}- Arrows/Merry-go-round Diamond Waymarks
{"Name":"12y Waymarks","MapID":1094,"A":{"X":100.0,"Y":0.0,"Z":88.0,"ID":0,"Active":true},"B":{"X":112.0,"Y":0.0,"Z":100.0,"ID":1,"Active":true},"C":{"X":100.0,"Y":0.0,"Z":112.0,"ID":2,"Active":true},"D":{"X":88.0,"Y":0.0,"Z":100.0,"ID":3,"Active":true},"One":{"X":94.0,"Y":0.0,"Z":94.0,"ID":4,"Active":true},"Two":{"X":106.0,"Y":0.0,"Z":94.0,"ID":5,"Active":true},"Three":{"X":106.0,"Y":0.0,"Z":106.0,"ID":6,"Active":true},"Four":{"X":94.0,"Y":0.0,"Z":106.0,"ID":7,"Active":true}}Others
Arena Images (click on image for full size)